

When I decided to make the move away from Final Cut Studio (and Final Cut Pro) I also took that time to completely upgrade my existing laptop with a Solid State Disk (SSD) and perform a clean install of the OS (from an optical disk no less!) and a clean install of Adobe Creative Suite 5. (CS5). Everything became quite snappy on this “new” laptop and I quickly became busy learning the ropes in Premiere. I upgraded an existing machine, but this also applies if you are making the jump to a new machine.
But, of course, I still have clients who need existing projects worked on, updated, tweaked, etc. For one client, I was in the midst of putting their finished video on YouTube for rental. I needed to grab 30 seconds of this video from the finished, stand-alone, rendered movie and make a new clip which I would upload separately and then link it as the preview file for the rental.
I went to my default tool, QuickTime Player and was flumoxed by the fact that I couldn’t set an in and out point to copy a portion of the clip. And then I realized what the problem was: the “Pro” part of QuickTime Player requires a separate $20 purchase from Apple to be activated. Using FCP for over 10 years meant that I never needed to buy QuickTime Pro separately. But now, leaving FCP behind, those QuickTime Pro features were no longer available to me. I needed to find another way to make excerpts quickly.

Selecting an excerpt in QuickTime Player Pro
In Premiere, I imported the source clip. Opened it in the viewer. Set my in and out points and couldn’t figure out how to export the clip from the viewer. So I dragged the whole thing into the timeline and then cut it down. Time to export. I really just wanted to copy what I had into a new file. No transcoding or anything. Then, I faced Premiere’s daunting Export module and was immediately flumoxed by the fact that I didn’t see “use current settings” anywhere. It wanted me to either pick one of the presets or create a new setting from scratch. This was getting much more complicated than I wanted to deal with.
I wanted my QuickTime Player Pro back.
I asked fellow professionals for help, and of course I was told that Premiere can do anything, that Vegas could handle this. Edius has no problem… but most of them missed the point. I wanted something fast and simple. On a Mac, especially one now with a speedy SSD in it, QuickTime Player opens and plays a clip in under a second. Creating an excerpt takes just 7 keystrokes:
- Double click the file, click spacebar to play,
- Type “i“, type “o“, Copy, New, Paste, Save, type a name, Enter
- Wait a moment, then Quit.
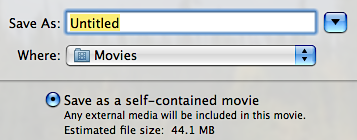
QuickTime Player defaults to saving the file as a “self-contained movie.” Doing this copies only the data between the In and Out points of your source movie into a new file. In the Finder, it literally does just COPY the footage from one file to the other. No transcoding. No export settings. It’s nearly as simple as selecting “Duplicate” in the Finder, except QuickTime Player Pro enables me to pick what portion of the source file to duplicate. This is why QuickTime Player Pro had become essential to an expedient workflow on my computer.
But how do I get QuickTime Pro back?
The answer lies in the registration file for Final Cut Studio that QuickTime Player checks to activate the Pro features of the app. This registration is nestled on the hard drive in a logical place, and just needs to be copied from the old hard drive to the same place on the new one.
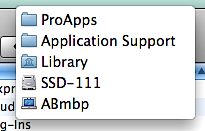
This is where you find the ProApps folder. Or where you put it if you need to make one.
Starting from the root level of the drive > Library > Application Support > ProApps Look for the “Final Cut Studio System ID.” That’s what you need to copy. On your new hard drive, go to the same place, and create the ProApps folder if you need to. Drag “Final Cut Studio System ID” from the old ProApps folder to the new one. Done.
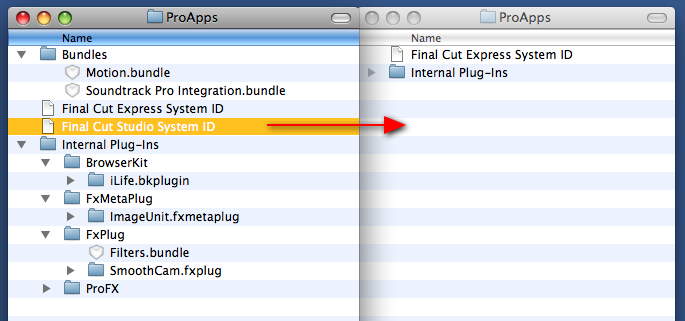
Copy this one file from your old system to keep QuickTime Player Pro features.
The next time you launch QuickTime Player, you’ll have full access to every feature it has.
Don’t be confused by the Final Cut Express files I have in my new ProApps folder. I have a client who requires that we swap project files back and forth so I am still using Final Cut Express for them. But installing Final Cut Express actually does NOT enable QuickTime Pro. So, I still needed to install QuickTime Pro separately.
If you aren’t cleaning out your System and Library folders, or using an application to remove all vestiges of Final Cut Studio (which spreads itself out into many different locations) then you probably will end up keeping the ProApps folder and QuickTime Player will continue to see your registration. But should you ever need to upgrade your hard drive, or move to a new Mac, and you’re not going to reinstall the old Final Cut Studio… you’ll want that one little file to keep the QuickTime Pro you’ve become accustomed to using.
.
|


Tried your receipe for migrating QT pro reg code from legacy FCP system. Does not seem to work for me in 10.8.2
I believe in 10.8, Apple may have deliberately prevented the old QuickTime pro from working. Generally every two OSes, Apple requires a new Pro registration.
Something curious on my system that makes me wonder if the QT Pro registration (from FCP Studio) has moved. I’m on El Capitan and Pro still works from my migrated system still but not a clean reinstall using your method, above. So the Pro registration is still valid for the OS but the moved bundle isn’t activating.