
by Hal Landen
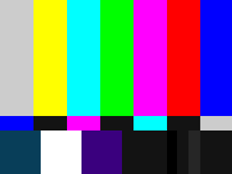
Color bars are an artificial electronic signal generated by the camera or by post production equipment. They are recorded at the head of a videotape to provide a consistent reference in post production. They are also used for matching the output of two cameras in a multi-camera shoot and to set up a video monitor.
Before we proceed, you should know that computer monitors are quite different from video monitors and TV sets. You are seeing this on a computer monitor so you will not have the same kind of controls or images as on a video monitor. In fact, if you create graphics on a computer monitor, it’s very easy to be fooled into thinking you have a great looking graphic for your video. But the only real test is when you see that image on a properly adjust video monitor.
The graphics on this page are for example only. You’ll want to use real color bars generated from a camera and viewed on a VIDEO monitor or TV set. Send engineering feedback on this article
To Set up a Video Monitor or TV
1. Allow the monitor to warm up for a few minutes
2. Dim the room lights and block any reflections on the monitor
3. Feed color bars to the monitor either from a camera or “house bars”
from your editing system
4. Set the contrast also called “picture” to its midpoint
5. Turn the chroma also called “color” all the way down until the color bars
are shades of black and white
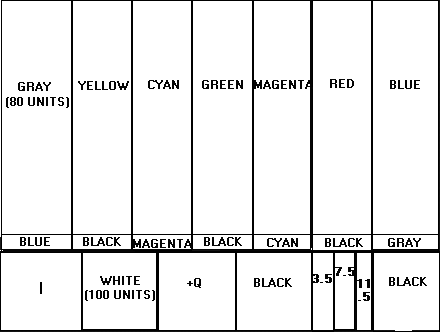
Diagram of Colors and Values
6. Notice the three narrow bars labeled 3.5, 7.5 and 11.5 on the bottom right. These are the
Pluge Bars which stands for Picture Lineup Generating Equipment. Adjust the brightness control until the middle (7.5 units) pluge bar is not quite visible. The lightest bar on the right (11.5 units) should be barely visible. If it’s not visible, turn the brightness up until it becomes visible.
Since 7.5 units is as dark as video gets, you should not see any difference between the left bar (3.5 units) and the middle bar (7.5 units). There should be no dividing line between these two bars. The only division you should see is between 11.5 and 7.5 (Note this same technique is used in setting the b&w viewfinder on your video camera.)
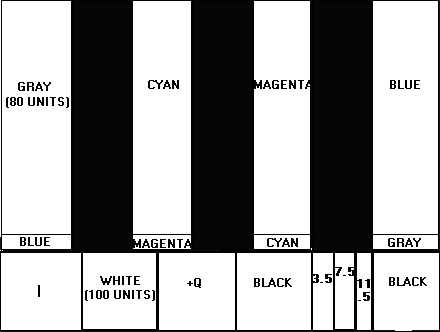
7. The next step is to set the contrast control for a proper white level. To do so, turn the contrast all the way up. The white (100 unit) bar will bloom and flare. Now turn the contrast down until this white bar just begins to respond. The image below shows what it should look like at this point.

Correct NTSC Color Bars without Color
The image below is INCORRECT.

Incorrect NTSC Color Bars without Color
The above image shows a monitor whose black level (brightness) is too high. Of the three pluge bars, only the 11.5 pluge bar should be visible.
NOW for the colors…
First a shortcut to adjusting hue: With a little experience you can avoid the next two steps by simply “eye-balling” the yellow and magenta. The yellow should be a lemon yellow without orange or green. And the magenta should not be red or purple. And you’re done.
But here’s another way: Many professional monitors have a blue-only switch. If your monitor has one, switch it on. If your monitor does not have a blue-only switch, you can use a piece of blue lighting gel. Hold it to your eye like a viewing lens. If you see any of the red, green or yellow colors, double the blue gel over to increase the blue effect.
By using the blue-only switch or a piece of blue gel, you have removed the red and green elements of the picture. Only the blue remains. If the tint and color (also called “hue”) are correct, you should see alternating bars of equal intensity as in the example below. With a little practice, you’ll be able to eye-ball this step fairly precisely.
8. With the blue switch on (or your blue gel in front of your eye) turn the chroma or color until
the grey bar at the far left and the blue bar at the far right are of equal brightness. One trick is to match either the gray or blue bar with its sub-bar.
9. Adjust the hue control until the cyan and magenta bars are also of equal brightness.
You can also match either of them with their sub-bars. Now the four bars – gray, blue, cyan, and magenta should be of equal intensity. The yellow, green and red (which are black in the diagram below) should be completely black.
Here’s a diagram:
Blue Only Diagram
Now here’s what it looks like “in color.”

Correct Blue Check (minus Red & Green)
You should now have a properly adjusted video monitor. However, if flesh tones don’t look right, you may need to make further adjustments to the chroma and hue. That’s why engineers say (half jokingly) NTSC means “Never Twice The Same Color.”
Correct NTSC Color Bars
Here’s what these same color bars look like on a waveform monitor:
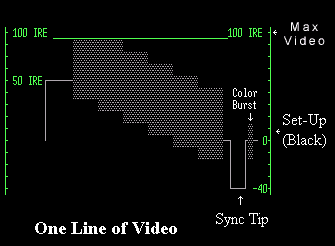
Color bars on a waveform monitor
Once you have set up your monitor, leave it alone. Unless you have a waveform and vectorscope, it’s the only instrument you have to see how accurate your video is. This is true of your camera viewfinder, your field monitor and your studio monitor.
After you’ve set up a few monitors, you’ll soon know what proper bars look like and then you’ll be able to easily “eye-ball it” with a fair amount of precision. For more information on the video signal, see the engineering article.
But before you get too technical, why not think about making your video business more PROFITABLE!
Also see PAL Color Bars contributed by Sheldon Kennedy.
Update: I’m grateful for the many great emails I’ve received about this article. One email resulted in the article being used, with my permission, in a sophisticated defense system. But of all the great email I have received, my favorite was from the Inventor of the Color Bar Generator. I have included that correspondence in a separate article.


What a beautifully concise explanation . If only the author of the DVE set up disc could have learned from you .Thankyou.
I refer other camera assistants here for a clear explanation of the set up process of the monitor. Thank you for posting such a clear explanation.
thanks for this ot help me with my media studdies so much. =] thanks again
Reaaaly good explanation
– Digital Film Student
This is a good article minus any video
hieroglyphics. But even after proper calibration
for CRT or LCD the fact remains that many folk
play DVDs in their default computer players
which I have found make even good video look
too dark. Is there a fine line between proper
monitor calibration and the dvd computer player?Can I adjust for both worlds ?
@ Vance
I believe this has to do with colorspaces. Computers default to 0-255 colorspace and a TV expects a 16-235. If you have a high quality TV you may find a “Studio Color” or “PC Color” option. This should solve your problem if not:
If your using Windows I’d recommend ffdshow tryouts and look at the Output and RGB Conversion. If your using Linux I recommend Mplayer with SMPlayer and read the Mplayer Man pages.
please tell us exact procedure to adjust pal monitors using color bars from camera
Great information..!
Under the displayed photos in this article it says
“NTSC Color Bars”
I am working in PAL, is there any difference or can I adjust my monitor with the above guidelines.
Suzana
It would be great if this could be updated with the new smpte hd color bars. I am not quite sure what all the extra bars are for and if I need to worry about them.
Thanks for the great resource. I agree with #10-bk. As our TV station SLOWWWWLY transitions to HD acquisition, Im curious about the HD bars and set up.
Thanks. Your article helped me calibrate a new DLP projector which insisted in overdriving the picture.
Thanks Hal, using this settled a lot of arguments with students on the proper calibration of my display monitors in-studio.
Very concise explanation! I have recommended that my students visit your site to get a different overview of the process.
Hi Mr. Laden,
I would like to know how to work with my 2 monitors (computer monitor and video broadcast monitor).
I have vhs tape whitout color bar that I capture with ATI AIW card with virtualdub via a computer
Between the VTR and the capture card I have a DPS-295 who can generate SMPTE bars signal pattern and a other device to help to correct the color.
My computer monitor is about 72% NTSC gamut (calibrated with spider4).
Now I can calibrate my broadcast monitor with the procedure describe above!
But do I have to calibrate also my computer monitor (again!) with this SMPTE bars? or this procedure is only for calibration of the analog signal?
Then for the colors, brithgness, saturation tuning for the capture do I have to rely on what I see on the the video monitor or on what I see on my computer monitor?
Thanks
Hi Remy,
Are you creating video on your computer? If so, you need to generate color bars from that device so you have a standard to gauge what the project will look like to others. If you are shooting video with a camera, the camera needs to output color bars on the tape or memory card. These colors help keep the colors consistent through the final product.
When you generate bars after the fact, you may be creating a false standard. As far as which monitor to rely, I would generally rely on the video monitor, but you are doing things differently.
Good luck,
Hal
Electronics stores often run the same video program to a wide number of displays to give you a chance
to evaluate the picture quality of each. Step back a few feet and you will see a significant difference
between the colors represented. Some look great and some look awful, and it is not always the quality
of the TV that is to blame.Often, the TV needs to be calibrated to its environment for the best
performance. Stores are notorious for turning up the color and image brightness to make the displays
more eye catching – image quality isn’t usually their biggest concern.Calibrating Your Home Theater
Television Will
It’s 2016 now, the dimensions have changed, so have the depth ov colors. You’d think smart TVs would have built in test bars, but they don’t. It would be nice to have links to pull up on these devices to adjust to our satisfaction when the auto functions aren’t doing it. Thoughts?
I agree that the color bars and test screens should be built in.
What is the function of the + Q and I fields?
Hi Leandro,
Here’s what Wikipedia says, “When a monitor is properly adjusted, the rightmost pluge bar should be just barely visible, while the left two should appear indistinguishable from each other and completely black. Also in the bottom section are two sections that contain -In-phase and +Quadrature signals (see YIQ), centered on black level and having the same gain as the color burst signal; these show up on the pattern as a square of very dark blue, and a square of very dark purple. On a vectorscope, they appear as two short lines ninety degrees apart. These are used to ensure that the television receiver is properly demodulating the 3.58 MHz color subcarrier portion of the signal. The vectors for the -I and +Q blocks should fall exactly on the I and Q axes on the vectorscope if the chrominance signal is demodulated properly.”
Still being used to this day. Great website