A great performance with a mediocre-looking video is much better than a great-looking video with a poor performance. So prepare yourself by knowing your lines and understanding what the scene is about and then rehearse. The material that has been selected for you to audition with is called Sides. These are a section of the TV or film script. If the sides were emailed to you, print them out. We’ll talk more about sides later.
You will need a quiet room. This is not as easy to find as you might think. Close your eyes and listen. Do you hear lawnmowers, computer fans, furnace, traffic, refrigerator? All of these sounds will detract from your audition video. The ideal wall to stand in front of should be blank with no pictures, books or TVs. White or blue are good colors for this background wall. Stand at least 4 feet from the wall. This should keep shadows from being visible on the wall.
Stick a piece of tape on the floor as your mark. You’ll need to stand in the same place to help keep lighting, camera view and sound consistent. Using a tripod will make a big difference in the video.
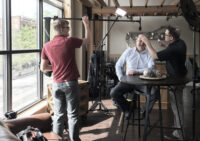
Spend some time arranging light so it is a soft light that is a foot or so higher than your face, but not overhead. An overhead light will not be flattering. A light from the front and about 20 degrees off center axis and a bit higher than your face will illuminate your eyes in a pleasing way which is very important. You can use a floor lamp, the light from a window or any light you have. Be sure the light is soft rather than hard. Hard light will cast a sharp and dark shadow. Soft light will cast a very soft shadow or no shadow at all.
Do number of tests to get the light looking just right. Take your time and get some help if necessary. Bad lighting will hurt your audition video.
Now we’ll look at getting good audio. In general, the on-camera microphone makes poor audio. This is usually because the subject is too far from the microphone. There are a couple of ways to dramatically improve the audio. First, you can move much closer to the camera. Just be aware that cameras will be out of focus if you move too close. You camera manual should tell you the minimum focus distance. Sometimes this is marked on the lens barrel.
A better way to record good audio is to use an external microphone with a cable. Many cameras have a mini plug input for external audio This mic plugs into the camera and clips to an area around the talent’s shirt pocket. This is usually about ten inches below the mouth. This type of microphone is called a lavaliere mic. You may be able to borrow one from a friend who is into audio recording.
Shoot a short test of yourself to test both the lighting and audio quality. These two aspects are very important. Frame the camera so it sees the top of your head down to your feet. Center the camera and make sure it does not cut off the top of your head.
You will generally want to have a friend read the off camera lines of the other characters, but be sure this person does not appear on camera. They should stand or sit next to the camera.
When ready, start the camera and let it run for 5 seconds. Then look into the camera, smile and say.
“Hi, my name is ______. I am ____ years old and I am reading for the ________ role.”
Let the camera run for another 5 seconds then stop it.
The casting director or whomever will watch this video needs to hear this information clearly. So say this slate in a your natural voice, very clearly and slowly. People will be writing it down. This is the first impression they will have of you. Make it a good one. But this is not acting yet, so just be yourself. Look right into the camera and give a nice and real smile.
Before you rehearse your lines, read the side (script sections) they sent you and figure out who your character is in these sides. What is your relationship with the other characters? What is your history, your background and your past?
If you can read the entire script rather than just the sides, this will help you understand the role. Agents usually have copies of the script so ask your agent for a copy of the script. If you will have the sides for three days or more, it is important that you memorize your lines. the competition is tough and this is one thing you can do to demonstrate how much you want the part.
The sides may have one to eight scenes for you to audition. You need to tape each scene separately.
Zoom the camera into a head and shoulders shot. The shot can be cut off at about your waist. Leave some extra space at the top so your head is not chopped off if this is watched on an older TV. Start the camera, slate each scene, do the scene, then stop. Do this two or three times for each scene so you can show only your best takes. Each scene must have a Slate and the scene number and then stop. This way you have a complete section you can put on the DVD.
Very Important. Never look into the camera for your scenes. The person who is reading the other characters’ lines to you should stand close to the camera so you can looking at their eyes.
This way the camera will see your face, but you are not looking into the camera. Don’t forget this.
Stand in one place. Stand still. Don’t sway from side to side. That would be distracting and you could go out of frame.
Now download the video to your computer and choose the best take of each scene with the slate. Some Casting Directors will ask you to upload the scenes to a web site. Others may want a DVD. Be sure to label your DVD with your name, project (Film or TV show name), your role, and your phone number and email address. It’s safer for you not to include your street address.
Send the DVD overnight. Express Mail at the Post Office is less expensive than Fed Ex and is guaranteed one day delivery for most locations. It also provides a receipt showing that it was delivered.


Very useful and concise. I was looking for answers to the 50GB limit imposed by casting directors, and you didn’t address that, but the rest of your stuff was bang-on. Thanks
Thanks, Dan. To get it under 60 GB which is simply too large a file, you can always shrink the video. It also be in Standard Definition. Ask a friend who has a video editing system. Sony Vegas Movie Studio can do this and it’s less than $60.