
(For Windows PCs)
By David Jon Devoucoux
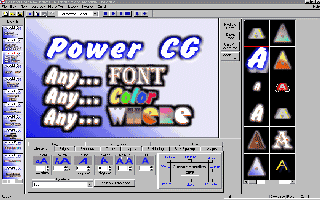
Power CG Plus Screen
The evolution of character generator programs for the PC has undergone massive changes in the past two years. Inscriber released Feature Pak and Motion Pak and AlphaCG has come on-line with excellent features.
Now Cayman Graphics has upped the ante again with a whole new interface, Power CG Plus.
BACKGROUND:
Power CG was named because its feature set was extensive and the program operated very quickly, updating itself so fast, most of the time we didn’t know the changes were being made. But all this speed came with a problem. Some users felt the interface was not easy to use. So despite protests from the rest of us, Cayman Graphics decided Power CG Plus was going to have a new interface as well as a new 32 bit layering engine for future features currently in the development stage. And guess what? The new interface works!
INSTALLATION:
Installation of Power CG Plus is quite easy. Place the CD-ROM or floppy disks in your machine and select “Run” from the “Start” menu. Select “CDROM” or your floppy drive and run the “setup.exe” program. Then either accept the default directory and drive or choose your own. Power CG will set up itself to your video and computer hardware automatically. Make a copy of the picon for your desktop and run the program. That’s it.
QUICK TOUR:
Lets take a quick tour around the interface of Power CG Plus. The interface automatically sets it self up during installation, depending upon the screen size your using. We are running 1024 X 768, 24bit color in our suite. We are also running Power CG Plus with the FAST Video Machine, DP/R and 3.3Plus. Power CG Plus is available for other platforms as well. More on that later.
Near the center of the screen is the Work Screen. This screen is an exact replication of your video work screen (ours is 640X480), so what you see on your work screen will be in the same place on your video screen.
To the right of the work screen is the Style Gallery. This is where you can store and recall up to 64 style templates you’ve built per project. Each style includes all character attributes including font, size, colors, edges, shadows, etc.
Below the work screen is the Tab Attribute folders. This is the major change in the Power CG Plus interface. Instead of having all the features available in one window, you now have a series of folders, each with its own feature set. Color, positioning, character attributes, and the rest, are all available here. Simply click on the tab and go to work. Even though it takes more “clicking” on the mouse to do what we used to do in one click, the interface is more in-line with the Windows’ “standard”.
To the left of the work screen is the Project Window. Here all the pages you have built are displayed as picons with their filenames. From here you can open a page with a left mouse click, or, export a page, save a page, etc., all with a right mouse click.
Finally on the top of the work screen is the standard Windows 95 pull down menus. Here is where you can set preferences, use the “On-Air” player and call up standard Windows commands as well as many Power CG Plus commands.
USING POWER CG:
Using Power CG Plus is really quite simple. Click on the work screen approximately where you want to start and type your characters. If you have a lot of text and have word wrap turned on (the default), continue typing. If you wish to use multiple lines for a name and title, you can select “Lower Third Mode” from the “Settings” pull down menu or place your cursor where you want the first line and type. Then hit “return” or click your cursor where you want the second line and type. You can always fine tune the position character by character or by word, line, layer or entire page.
TIP: If you have a lot of information and want to overlap some of the text with graphics or more text, or wish to create a really complicated page, use the layering function of Power CG Plus. You have 999 layers available to you per page, so wherever you hold down the control key while left clicking on the mouse, you’ll be adding a new layer. Place the cursor where you want to type a new layer and “control click”, then continue typing. You are now on a new layer and can have any font or attribute you wish without any restrictions from the previous layer or layers. If you get lost and don’t know what layer you are on, click on the “Layer” tab and click on each layer that’s listed. The cursor automatically goes to the first character on that layer. You can choose to “Hide” the other layers, if you wish to see exactly what’s on each layer. By the way, on the FAST Video Machine version, while we type we immediately see the typing on the video screen as well, so we can line up graphics and shapes on different layers with live video running at the same time.
Once you’ve typed your information for the page (if you didn’t format it first), you can format it as you like. Change font, character size, color, add one of three shadows or two edges, or move any group of characters anywhere you want. Since Power CG Plus allows 25 typefaces, 16 textures and unlimited styles per page, there’s very little chance you will run out of resources creating a page.
One of the reasons we recommend that you try typing first, then formatting, is with layers you can make any changes you want without affecting anything on another layer. And when your client likes to make the inevitable changes, layering is a blessing. Having 1000 levels of undo doesn’t hurt either. By the way, the undo function doesn’t use system resources like other programs.
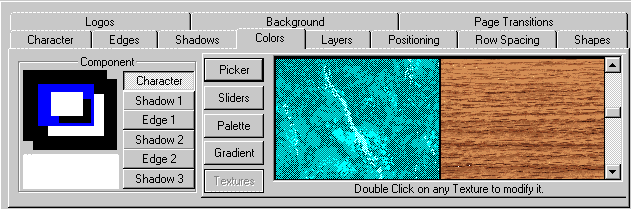
To change or modify any character attribute, first select the characters you wish to change by left mouse click and drag, then click on the tab folder you want. Let’s look at some of the tabs available to you.
The “Character” tab lets you change fonts, sizes, rotation and blur for the characters. Tip: If you click/hold on any of the little numerical value windows with the left mouse button and drag the mouse, the values will change dramatically. You can make some rapid changes by using the mouse to click and drag. A new feature with Power CG Plus is the “Cursor Handles”. When you turn this feature on, the cursor now has 8 “handles” you can grab and change the size, height, width, italics and position of the character or characters you’ve selected. These changes can be made right from the work screen. TIP: You can also “grab” all character attributes by selecting the character on the work screen and saving into the Style Gallery. When you want to use that style again, select the text you wish to change and “Apply” those attributes with one mouse click from the style gallery.
The “Edge” tab opens the edge box with complete controls for two separate edges. Each edge can have many of the character attributes, like any color, color gradient or even a texture. You can soften the edge and extrude, highlight, surround or drop shadow it in any of 8 different directions.
The “Shadow” tab gives you three separate shadow to use. Again, most of the character attributes can be applied to shadows as well. The shadows can also take their shape from either a character or an edge. So if you have a sharp edged character and want to put a colored shadow around it that’s sharp then assign one shadow to take their shape from the character. If you want the second shadow to be soft like a soft edge you can do that as well. With two edges and three shadows we’ve been able to build nice neon characters with rounded looking edges and a multiple of shadow/edge looks.
The “Shapes” tab allows the building of shapes which can be different sizes and can use all of the character attributes like color, edges, shadows, etc. We use this tab to build borders around images, background color gradient boxes or separators built with color gradations between areas of a page.
The “Color” tab is where we spend lots of time having fun. Yes, you can select your characters and choose a color, but that’s boring! With Power CG Plus, you can produce 4 or 5 point “Area” gradients for backgrounds, shapes, edges or shadows. If you’re really adventurous, apply a “Linear” gradient. A linear gradient can be from one color to any number of other colors or shades of color, in any direction. So if you want your character face to be a rainbow hue of color on a diagonal, not a problem. The color tab also has a color “picker”, color sliders in RGB and HLS (hue, luminance, saturation ), video and background transparency sliders as well as the standard color palette window where you can create your own custom color palettes, up to 64 per page. The “Color” tab is also where you can apply a texture to any characters, shadows, or edges. Note that any color gradient you create can be saved in its own separate gradient gallery.
Other tabs include “Position,” “Backgrounds,” “Logos,” “Row Spacing” and “On Air.” The “Position” tab allows minute changes in any selected character’s position by the row, layer or page including justification. You can still drag and drop with the right mouse button on the work screen, but this tab will center or justify for you easier.
Power CG Backgrounds
The “Background” tab allows you to bring in a color background or a picture image using the most popular file types like .tga, .tif, .bmp and more. The background can be full screen or sized.
With the “Logos” tab you can make your own logos from a picture image and import it in, up to 16 per page. We use this feature for charge card images or when a client has custom images needed for bullet points, like weather logos showing rain or sunshine.
The “On-Air” tab allows you to set up a slide show and choose the transitions between each image. The presentation comes directly off the hard drive of your computer, “live,” so you don’t have to wait and render a demo to videotape. I think this feature may be of interest to event videographers. For those of you who have a waiting room in your office where customers can look over some of your work, having a computer monitor running a demo of your pages would certainly put you one step ahead of your competition. You could even customize the presentation. No other CG program has this capability.
CONCLUSIONS:
Power CG Plus does so many things quickly and well, it’s hard to find fault. If we were to complain about anything, it would be that in the original version, I could apply any character attribute with only one mouse click. Now, I have to open the attribute tab then select the attribute. I understand Cayman Graphics’ desire to make the new interface more “Windows” like, but I will miss the speed of the older interface. I also found the first beta releases of Power CG Plus to be slower in drawing pages than version 3.1. However, Cayman Graphics must have done some code “housekeeping” because the latest release version seems a tad faster than 3.1. And that is with multiple layers active. It’s still equal to or faster than Inscriber’s Feature Pak and Alpha CG from Innovision.
Power CG Plus allows instant video screen viewing on some edit systems. It will export directly into our video editing program (FAST’s Video Machine) whether its open or not. You can also export your pages out in TGA’s or BMP’s. I’ve heard rumors that some advertising people are using Power CG to create their print layouts.
Power CG Plus operates as a stand-alone or as a plugin on Windows 95 and NT. It is available for FAST’s Video Machine, Insync’s Speed Razor, Pinnacle Systems’ Alladin and Genie Plus, Magni’s VGA Producer, Adobe Premier and Ulead’s Media Studio. Power CG Plus is also available as a Standard version for creating graphics for any system that can display 32 bit TGA or BMP images.
With an extensive feature set: tabs, safe title mode, lower third mode, TrueType fonts, word wrap, leading and kerning, sub-pixel rolls (1000 rows)and crawls (8000 characters), cut, copy, paste and more, and, an easy to use interface, Power CG has upped the ante again for desktop Character Generators.
Power CG Plus is now shipping. The package includes the media, a dongle and a manual. If the manual is as thorough as the previous version’s manual, it will be comprehensive yet easy to understand.
For more information contact your dealer or Cayman Graphics on the web www.caymangraphics.com or call 1-801-254-6979.
c 1998 David Jon Devoucoux ALL RIGHTS RESERVED
David Jon Devoucoux is an Award winning Independent Producer/Director and a 32 year veteran of Audio/Video and Film Production. He has written, produced, directed and shot for network and corporate clients worldwide. Mr. Devoucoux resides in Phoenix, Arizona.


Recent Comments